
Preparing your samples
The following examples of some sample preparation are not necessarily what will work for your sample. It is always best to consult papers or other sources for sample preparation procedures but these general examples can be used to prepare samples for light, optical, and electron microscopy.
Suspension cells can be attached to slides by centrifuge.
This is important for immunolocalization, where the tissue on the slide undergoes lengthy and sometimes harsh treatment and thus tends to be lost in the process.
Reagants/Supplies:
- Sigma P8920 Poly-L-Lysine solution (0.1% w/v) diluted 1:10 in distilled or ultrafiltered water to make working solution. Store this solution refrigerated in a plastic container. The solution can be used for no more than ~25 slides/50mL of the working solution.
- Slide: VWR Micro slides 4830-036 (other brands may be ok but these are what we tested)
- Clean slides in acetone for 5 minutes.
- Remove slides and wipe them with a kimwipe.
- Air dry the slides at an upright angle.
- Dip the slides in 1:10 diluted Poly-L-Lysine solution in a plstic coplin jar for 15 minutes.
- Air-dry the slides at an upright angle again.
- Mark the top-right corner with a diamond-edged pen.
- Bake the slides for 1 hour at 55°C.
- Make a 0.5% w/v gelatin solution in distilled/ultrafiltered water. Dissolve the gelatin while stirring on a heated stir plate (on low heat setting).
- Etch pre-cleaned, frosted microscope slides in 5% H₂SO₄ for 5 minutes, stirring occasionally to keep the slides from sticking together.
- Wash well in distilled water. Keep the slides under the water and do not allow them to dry.
- Fill a Coplin jar with the gelatin solution and immerse the slides for a minute or so, remove them, and place them on a rack to dry overnight.
- Store the slides in a storage box.
- Prepare Gatenby’s glue: 27% v/v ethanol, 6.3% v/v acetic acid, 1.35% w/v gelatin, 0.09% w/v KCr(SO4)2. Stir without heating until the gelatin dissolves (this can take a very long time).
- Etch pre-cleaned, frosted microscope slides in 5% H2SO4 for 5 minutes, stirring occasionally to keep the slides from sticking together.
- Wash well in distilled water. Keep the slides under the water and do not allow them to dry.
- Apply a small drop of Gatenby’s glue on one end of a slide and use the edge of another slide to drag and spread the glue across to the opposite end of the slide. Let the slides dry and store them in a storage box to protect them from dust. These slides should be ok for several days but the shelf life has not been established.
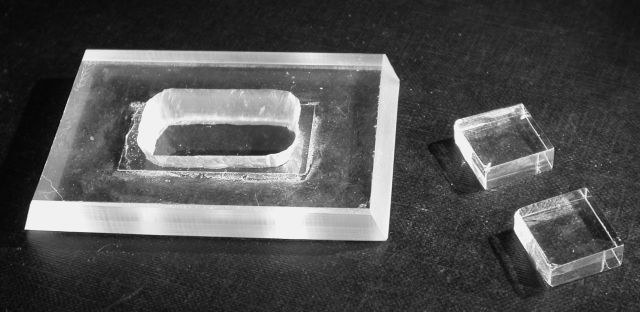
You can use a piece of 3″ x 2″ plexiglass (3/8″ or 10mm thick) with the short edges slightly beveled so that the microscope slide holder can grab the plexiglass and hold it down. This piece has a rectangular hole ~2mm smaller than the coverslip used (such as 22x40mm coverslips). The coverslip is glued to the bottom side of the chamber with silicone caulk so that if the coverslip breaks it can be scraped off with a razor blade and replaced with a new one. The coverslips are individually measured with a micrometer gauge and only those close to 0.170mm in thickness are used (range of 0.165-0.175mm).
The specimen, such as plant leaf tissue, is held in place with a small glass “brick” made on a glass knife maker from a leftover glass strip used to make knives for EM. One or two of those glass bricks are enough to flatten and press the specimen against the coverslip.
Note: Tissue sections need to be less than 100 microns thick for confocal microscopy.
This procedure according to Erdtman (The acetolysis method. Svensk Botanisk Tidskrift, 1960 54: p. 561-564) destroys and extracts everything except for exine, the highly resistant outer shell of pollen that bears characteristic morphological features used in pollen identification. The extracted pollen can then be infiltrated with suitable mounting medium for light microscopy. This technique has been used for high-resolution 3D imaging of pollen (Vitha, S., Bryant, A. Zwa, and A. Holzenburg, 3D Confocal Imaging of Pollen. Microscopy Today, 2010. 18(02): p. 26-28). All processing is done in 15mL polypropylene conical tubes.
- Add 5-10mL 5% w/v KOH, incubate at 80° C for 10 minutes, stirring every 2 minutes.
- Optionally, for material with debris, filter the suspension through a nylon mesh with a pore size larger than the size of pollen to be recovered.
- Centrifuge at 1000x g for 5 minutes.
- Discard the supernatant, resuspend the pellet in 3-5mL concentrated HCl by vortexing or stirring, and add water to 15mL.
- Centrifuge at 1000x g for 5 minutes.
- Discard the supernatant, add 10mL of glacial acetic acid, vortex to resuspend the pellet.
- Centrifuge at 1000x g for 5 minutes.
- Decant the supernatant, vortex tot resuspend the pellet in the remaining liquid.
- Slowly add 10mL acetolysis mixture (90% v/v acetic anhydride, 10% v/v sulfuric acid), stirring frequently.
- Incubate at 80° C for ~7 minutes, stirring every 2 minutes.
- Add 1-2mL glacial acetic acid, stir and centrifuge as before.
- Decant and vortex to resuspend the pollen in the remaining liquid.
- Store.
This protocol has proven successful for many plant species and tissues. It contains several improvements over the original protocol and also deals with possible sources of errors and their elimination. Download: GUS_Localization_in_plants.pdf
Advantages:
- Soluble in ethanol so there’s no need to use hazardous solvents such as xylene
- Low melting point (~35°C) allows embedding without excessive heating which makes it much more convenient to work with than paraffin
- Excellent preservation of antigenicity
- Serial sectioning is possible as this is a ribboning medium
Disadvantages:
- Low melting point which means that embedded blocks should be kept cool or refrigerated.
- More expensive than paraffin
- Section adherence to slides may be weak for certain specimens and may be problematic for in situ hybridization where most sections may be lost in the lengthy protocol
This embedding medium has been used for immunolocalization of numerous antigens in both plant and animal tissues. As always, optimal fixation and immunostaining conditions for a particular antigen and antibody will have to be tested.
Vitha, S., Baluška, F., Jasik, J., Volkmann, D., and Barlow, P. Steedman’s Wax for F-actin Visualization in Actin: a Dynamic Framework for Multiple Plant Cell Functions, Staiger, C.J., Baluška, F., Volkmann, D., and Barlow, P., Editors. 2000, Kluwer: Dordrecht, The Netherlands. p. 619-636.
Steedman, H.F. A new ribboning embedding medium for histology. Nature, 1957. 179: p. 1345.
The protocol allows excellent penetration of fixatives, good structural preservation and infiltration of the specimens with the embedding resin. The embedded material can then be sectioned for either light or electron microscopy. A scientific-grade, cooled laboratory microwave (Pelco Biowave) is used throughout the fixation and dehydration to improve and accelerate the process. Nematodes, just like insects, present a challenge for fixation and embedding, because of their low permeability. This is circumvented by applying osmium-vapor prefixation. The fixation step itself includes acrolein, an often-neglected fixation agent that offers excellent penetration and fixation quality. Please note that for other specimen types this protocol may have to be modified. Download the protocol: Microwave_protocol.pdf
Outline of the protocol:
- Osmium vapor pre-fixation.
- Aldehyde-fixation (microwave-assisted).
- Osmium post-fixation (microwave-assisted).
- Washing (microwave-assisted).
- Dehydration in methanol (microwave-assisted).
- Resin infiltration.
- Polymerization.